Since every detail of the production process has an effect on the stylus’ quality, all of our employees are extremely focused when crafting your stylus.
Making a stylus is not simply about assembling the tip, cantilever, rubber damper, and knob, but there are also many other small parts depending on the brand. Some require further specialized skills to assemble.
We are especially glad to be in this profession when a customer tells us: “I’ve been looking for this for a long time!” or “Please keep making this!”
When we receive orders that are particularly difficult to produce, due to their complex internal structure despite having a deceptively simple external appearance, we are exceptionally excited for the opportunity to prove our skills.
HOW OUR STYLI ARE MADE
These ABS resin pellets are the raw material used to create the knob, an essential part of the stylus. The resin and colorant are carefully blended for 20 minutes using a mechanical mixer until the precisely specified color is achieved.
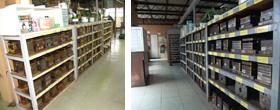
There are around 200 basic ABS resin color samples, which are stocked and molded into knobs ready to be assembled once an order is received.
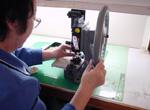
One of our employees skillfully preparing a shank, the key piece that holds the delicate moving parts known as the oscillation system.
This is an Injection Molding machine, where molten resin is injected into a metal mold at a temperature of 200 degrees Celsius.
The temperature required for the resin to flow varies from 170 to 230°C, since the size of the mold depends on the shape of the knob. In addition, the melting point of the resin depends on its color. Controlling not only temperature, but pressure as well is crucial.
Nearly 2000 different molds used in injection molding are kept organized and regularly maintained.
A knob that was precisely made to fit the shank. If the knob and shank are not made according to exact specifications, neither will attach to the cartridge.
Molded knobs are sorted by mold number, and stocked. We assemble the knob and oscillation system once we receive an order.
Here our custom made jig is used to cut a pipe that will become the cantilever.
Pressing the end of the cantilever forms the base where the diamond tip is fixed with the help of another custom jig. Attaching the diamond tip is perhaps the most difficult segment of the production process.
The cantilever, with diamond tip attached, is then placed into a purpose-built holder to be manually inspected with an optical microscope for irregularities in the tip’s shape and placement.
Other parts that need to be assembled with the stylus, such as a cleaning brush in front of the tip, are attached.
A third jig is used to insert the integrated diamond tip and cantilever into the holder and knob.
The stylus then becomes magnetic via the magnetization machine.
After the stylus is magnetized, a total inspection of all components is enforced before shipment to test if sound signals are faithfully reproduced. Inspection is done by ear and by oscilloscope.
Items that pass inspection are placed into our custom case. The outside of the case is then covered with a cardboard sleeve.
For Super Analog Stylus (SAS) products, there is a special package.
After the case and cardboard sleeve are wrapped in another layer of packaging material, the package is put into an envelope, labeled, and sent.
This website uses cookies to improve your experience. Read MoreACCEPT
Privacy & Cookies Policy
Privacy Overview
This website uses cookies to improve your experience while you navigate through the website. Out of these cookies, the cookies that are categorized as necessary are stored on your browser as they are as essential for the working of basic functionalities of the website. We also use third-party cookies that help us analyze and understand how you use this website. These cookies will be stored in your browser only with your consent. You also have the option to opt-out of these cookies. But opting out of some of these cookies may have an effect on your browsing experience.
Necessary cookies are absolutely essential for the website to function properly. This category only includes cookies that ensures basic functionalities and security features of the website. These cookies do not store any personal information.